You want a kitchen that works as hard as you do, even when square footage fights back. This article shows practical, space-smart ideas that make your small kitchen feel organized, brighter, and more functional without a major remodel. Expect straightforward solutions that improve workflow, free up counters, boost storage, and add useful lighting and seating—so you can cook, store, and gather in a compact space with confidence. Table of Contents1) Install floating shelves to free up counter space and display essentials.2) Use pull-out pantry racks to maximize vertical storage.3) Incorporate under-cabinet lighting for better visibility and ambiance.4) Choose compact, integrated appliances to save room.5) Opt for a fold-down breakfast bar instead of a full dining table.Maximizing Kitchen WorkflowUnderstanding the Work TriangleSpace-Saving Appliance PlacementDesign Principles for Small KitchensChoosing Colors and FinishesLighting Strategies 1) Install floating shelves to free up counter space and display essentials. Floating shelves create usable storage without occupying floor or counter area. You can store everyday items like plates, spice jars, or mugs within easy reach while keeping countertops clear for prep. Choose materials that match your kitchen’s style and the load you expect to carry, such as solid wood, plywood, or MDF with appropriate reinforcement. Mount shelves into studs or use heavy-duty anchors and hidden-bracket systems to protect against sagging and accidents. Arrange frequently used items on the lowest shelf and decorative pieces higher up to balance function and appearance. Leave enough open space so the arrangement looks intentional rather than cluttered. Keep weight limits in mind and avoid overloading shelves with heavy appliances. Periodically check fasteners and shelf condition to maintain safety and longevity. BAOBAB WORKSHOP Solid Wood Floating Shelves for Wall 12 Inch Wide… Natural Wood Floating Shelves: These real wood shelves are handcrafted from 100% solid pine and finished in a warm walnu… Heavy-Duty Floating Wood Shelf: With a natural walnut finish and clean floating design, these deep wood shelves provide … Wide Wooden Wall Shelves: This set of two floating shelves for wall decor includes hidden mounting hardware, an instruct… $35.99 Buy on Amazon 2) Use pull-out pantry racks to maximize vertical storage. Pull-out pantry racks turn narrow vertical spaces into highly accessible storage. You slide the unit out to see items at every height, which reduces wasted deep-shelf space and prevents items from getting lost at the back. Choose slim, tall pull-outs for gaps between appliances or beside cabinets. Under-counter or full-height versions work; pick shelf depths and rail strength to match the items you store. Organize by frequency: keep daily staples at eye level and less-used goods above or below. Use clear bins or labeled baskets on the racks to keep small packages tidy and to make restocking faster. Install adjustable shelves or modular baskets to adapt as your needs change. That flexibility lets you store tall bottles, cans, or stacked boxes without rebuilding the unit. Seinloes 2Pack Expandable Pull Out Cabinet Organizer 21″Deep With… Raising Pads For Framed Cabinets:Equipped with innovative raising pads, this pull out cabinet organizer ensures compatib… Important Note: To ensure compatibility, please note that this drawer is suitable for cabinets with a width exceeding 13… Adjustable Width for Tailored Storage: The Seinloes Pull-Out Cabinet Organizer adjusts from 12.05 to 20.4 inches wide, f… $54.98 Buy on Amazon 3) Incorporate under-cabinet lighting for better visibility and ambiance. Install under-cabinet lights to remove shadows on your countertops so tasks like chopping and reading recipes become safer and easier. LEDs deliver bright, even light with low heat and low energy use, making them a practical choice for small kitchens. Choose between fixed light bars, flexible LED strips, or puck lights based on the look you want and how much directional light you need. Plug-in options simplify installation; hardwired or battery models keep surfaces cleaner of cords. Use warm white LEDs (2700–3000K) for a cozy feel or neutral white (3000–4000K) for crisper task lighting. Add a dimmer or multi-level control so you can shift from strong prep light to soft ambient glow when you’re done cooking. Mount lights toward the front edge of the cabinet or on a small underside valance to minimize glare. Positioning and proper spacing matter more than brightness alone; aim for even coverage across the work surface. Govee RGBIC LED Strip Lights, Smart LED Lights for Bedroom, Bluet… Smart RGBIC Effects: RGBIC LED Strip lights for bedroom display multiple colors on one line at a time compared with trad… Smart APP Control: You can unlock various features to personalize smart LED strip lighting via Govee Home App, getting r… DIY with Inspiration: You can choose from a variety of lighting effects (16 million colors) and share your piece of art … $14.99 Buy on Amazon 4) Choose compact, integrated appliances to save room. Select appliances sized for small footprints, such as slim fridges, drawer dishwashers, and narrow ovens. These units free up floor and counter space without sacrificing core functions. Opt for integrated or built-in models that sit flush with cabinetry to create a seamless look. That reduces visual clutter and makes your kitchen feel larger. Prioritize multi-function appliances like combination microwave-ovens or cooktops with integrated ventilation. Fewer standalone machines mean less counter crowding and simpler workflow. Pay attention to door swing and clearances when measuring. Compact appliances can still require space to open, so plan placements that avoid blocking walkways or workspace. Choose finishes and controls that match your cabinets for a cohesive aesthetic. Matching panels or concealed handles help the appliances blend into the room and keep the focus on efficient design. 5) Opt for a fold-down breakfast bar instead of a full dining table. A fold-down breakfast bar gives you dining space when you need it and disappears when you don’t, freeing floor area for movement. It fits small kitchens, studio apartments, and narrow galley layouts without requiring a dedicated dining zone. Choose a wall-mounted or hinge-attached counter that matches your countertop height for comfortable seating. Use durable materials like plywood with a laminate finish or a solid wood top for a long-lasting surface. Add slim, backless stools that tuck neatly under the bar to keep sightlines open and maintain visual space. Consider countertop extensions with brackets or a pull-out shelf if you want a temporary work surface for prep or a laptop. Install under-bar hooks or a small shelf above the bar for frequently used items to keep the surface clear. Good task lighting—an adjustable sconce or a pendant—makes the bar more usable for meals and work. Maximizing Kitchen Workflow You’ll arrange work zones so walking distance and reaching are minimized. Prioritize direct paths between prep, cooking, and cleanup, and place appliances and storage where you’ll use them most. Understanding the Work Triangle Keep three primary points—sink, cooktop, and refrigerator—close but not cramped. Aim for 12–26 feet total perimeter distance between the three; shorter distances reduce steps, while longer ones waste time. In very small kitchens, a compact triangle of 7–12 feet can work if you avoid obstacles between points. Position the sink between the cooktop and refrigerator when possible; this supports a natural flow from food storage to prep to cooking. Ensure at least 36 inches of clear aisle space in front of each workpoint so doors and drawers don’t block movement. Use task-specific storage—store knives and prep tools near the sink, pots and pans adjacent to the cooktop, and plates near the dishwasher—to cut motions and increase efficiency. Space-Saving Appliance Placement Choose appliance sizes and locations that match your routine. Install a narrower refrigerator (18–24″) if you mainly store perishables cleverly, or a 24″ dishwasher drawer if you wash small loads often. Place the microwave above the counter or integrated into cabinetry at elbow height to save counter space and keep it accessible without bending. Mount the range hood or microwave over the cooktop to consolidate ventilation and maintain clear counters. If you use multiple small appliances, create a dedicated “appliance garage” with a retractable door near a power outlet to hide devices and keep cords tidy. Finally, cluster plumbing- and vent-dependent appliances (dishwasher, sink, and range) on the same wall when possible to reduce installation complexity and reclaim usable space. Design Principles for Small Kitchens Prioritize visual openness, functional surfaces, and targeted light so your kitchen feels larger and works better. Choose finishes that reflect light, keep clutter minimal, and layer task and ambient lighting for cooking and prep. Choosing Colors and Finishes Use a limited palette of two to three colors to avoid visual clutter. Light, neutral wall colors—soft white, warm beige, pale gray—reflect natural light and make the room appear bigger. Reserve stronger colors for one small focal element, like an island, lower cabinets, or backsplash. Select cabinet finishes that balance reflection and durability. Semi-gloss or satin finishes on upper cabinets help bounce light without showing every fingerprint. Matte on lower cabinets hides wear. Match countertop color closely to cabinet tones to create visual continuity and reduce apparent seams. Pick backsplash materials that are easy to clean and visually continuous with counters when possible—large-format tile or a single slab of stone works well. For hardware, choose slim-profile pulls in a single metal finish to keep lines tidy. Keep visible surfaces minimally patterned to reduce visual noise. Lighting Strategies Layer three light types: ambient, task, and accent. Ambient light can come from a central ceiling fixture or recessed cans; aim for even illumination of 300–500 lux at counter height. Task lighting must be bright and shadow-free—install under-cabinet LED strips or puck lights directly above prep zones. Use directional pendant lights over islands or narrow tables to concentrate light where you work. Choose fixtures with a diffusing element to avoid glare. Add accent lighting in open shelving or toe-kick LEDs to create depth and a sense of space at night. Pay attention to color temperature: 3000–3500K gives a warm, natural look for most kitchens. Use dimmers on ambient and pendant circuits so you can adjust brightness for cooking versus entertaining. Keep wiring and fixtures compact to preserve storage and clear sightlines.
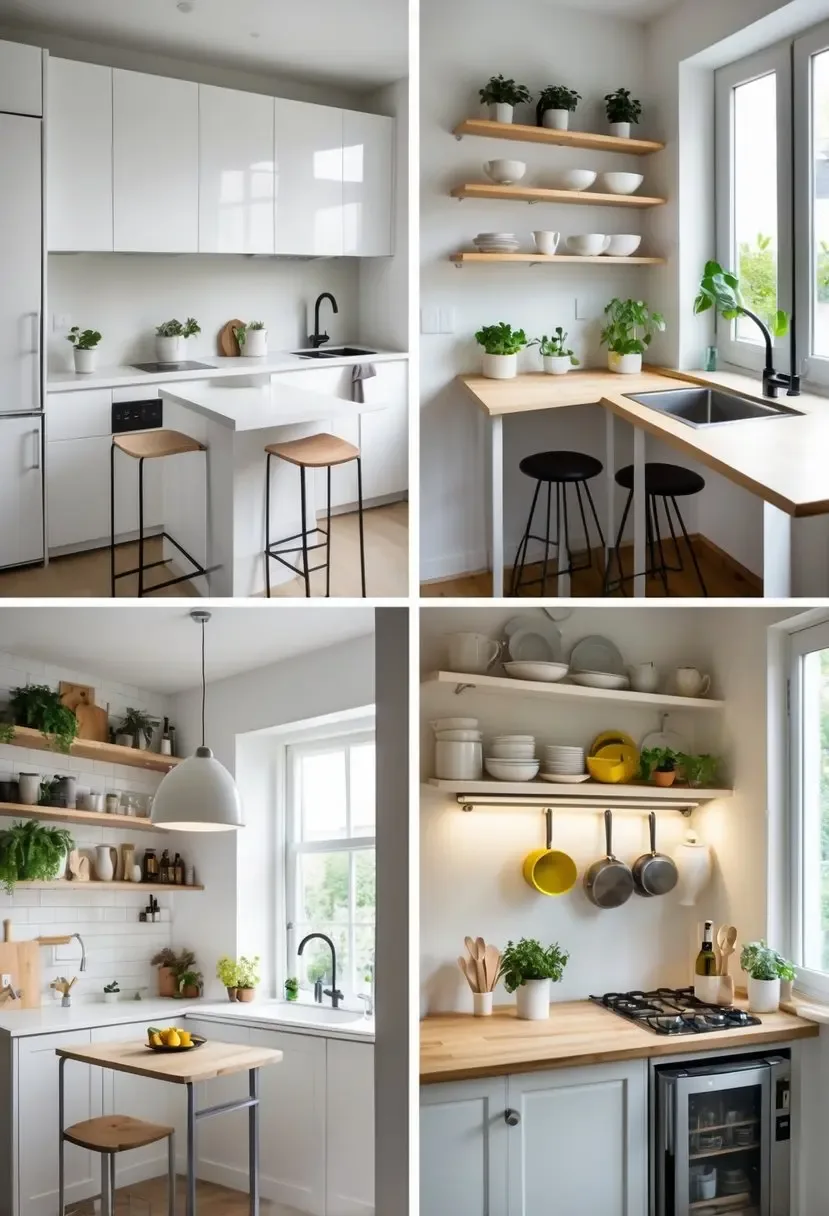
You want a kitchen that works as hard as you do, even when square footage fights back. This article shows practical, space-smart ideas that make your small kitchen feel organized, brighter, and more functional without a major remodel.
Expect straightforward solutions that improve workflow, free up counters, boost storage, and add useful lighting and seating—so you can cook, store, and gather in a compact space with confidence.
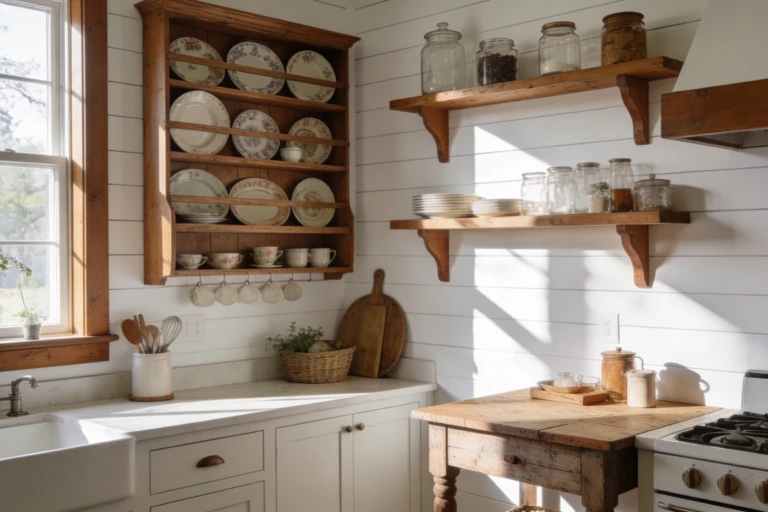
Floating shelves create usable storage without occupying floor or counter area. You can store everyday items like plates, spice jars, or mugs within easy reach while keeping countertops clear for prep.
Choose materials that match your kitchen’s style and the load you expect to carry, such as solid wood, plywood, or MDF with appropriate reinforcement. Mount shelves into studs or use heavy-duty anchors and hidden-bracket systems to protect against sagging and accidents.
Arrange frequently used items on the lowest shelf and decorative pieces higher up to balance function and appearance. Leave enough open space so the arrangement looks intentional rather than cluttered.
Keep weight limits in mind and avoid overloading shelves with heavy appliances. Periodically check fasteners and shelf condition to maintain safety and longevity.
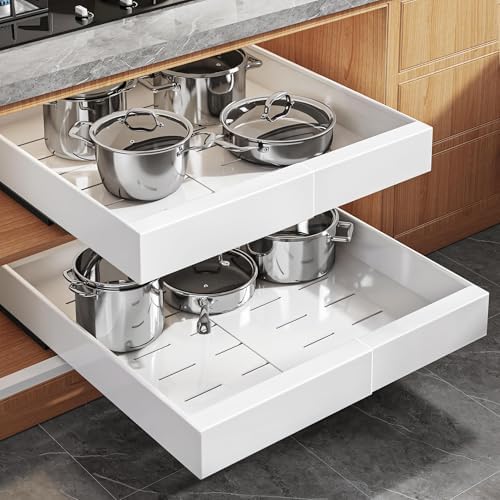
Pull-out pantry racks turn narrow vertical spaces into highly accessible storage. You slide the unit out to see items at every height, which reduces wasted deep-shelf space and prevents items from getting lost at the back.
Choose slim, tall pull-outs for gaps between appliances or beside cabinets. Under-counter or full-height versions work; pick shelf depths and rail strength to match the items you store.
Organize by frequency: keep daily staples at eye level and less-used goods above or below. Use clear bins or labeled baskets on the racks to keep small packages tidy and to make restocking faster.
Install adjustable shelves or modular baskets to adapt as your needs change. That flexibility lets you store tall bottles, cans, or stacked boxes without rebuilding the unit.
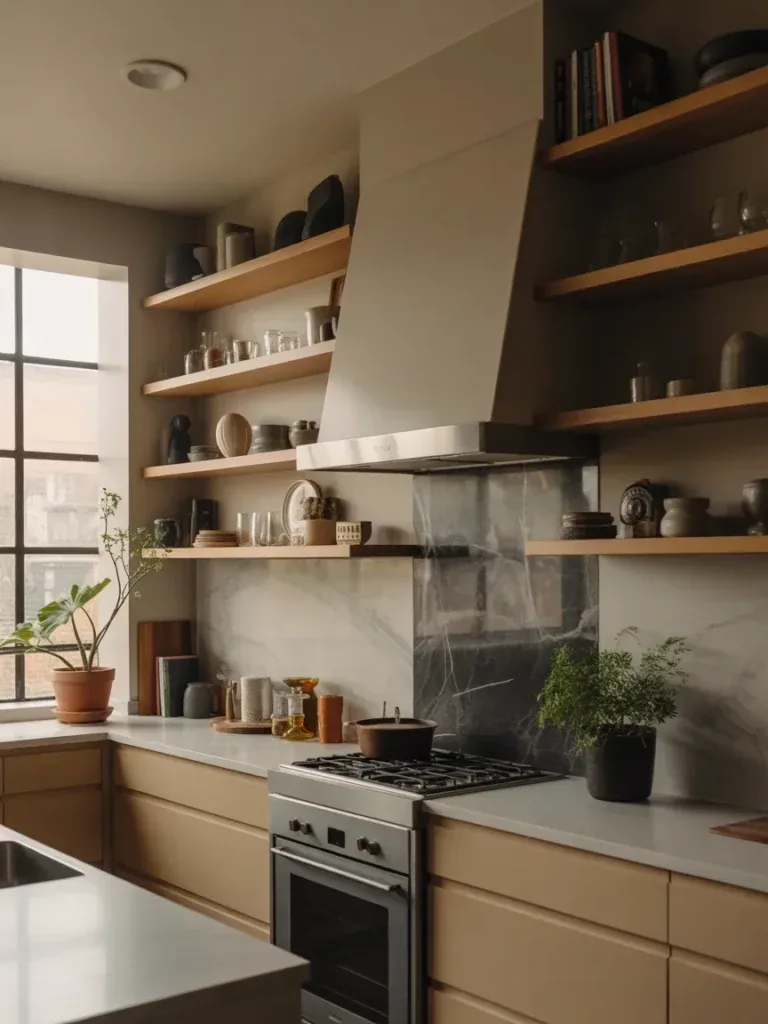
Install under-cabinet lights to remove shadows on your countertops so tasks like chopping and reading recipes become safer and easier. LEDs deliver bright, even light with low heat and low energy use, making them a practical choice for small kitchens.
Choose between fixed light bars, flexible LED strips, or puck lights based on the look you want and how much directional light you need. Plug-in options simplify installation; hardwired or battery models keep surfaces cleaner of cords.
Use warm white LEDs (2700–3000K) for a cozy feel or neutral white (3000–4000K) for crisper task lighting. Add a dimmer or multi-level control so you can shift from strong prep light to soft ambient glow when you’re done cooking.
Mount lights toward the front edge of the cabinet or on a small underside valance to minimize glare. Positioning and proper spacing matter more than brightness alone; aim for even coverage across the work surface.
Select appliances sized for small footprints, such as slim fridges, drawer dishwashers, and narrow ovens. These units free up floor and counter space without sacrificing core functions.
Opt for integrated or built-in models that sit flush with cabinetry to create a seamless look. That reduces visual clutter and makes your kitchen feel larger.
Prioritize multi-function appliances like combination microwave-ovens or cooktops with integrated ventilation. Fewer standalone machines mean less counter crowding and simpler workflow.
Pay attention to door swing and clearances when measuring. Compact appliances can still require space to open, so plan placements that avoid blocking walkways or workspace.
Choose finishes and controls that match your cabinets for a cohesive aesthetic. Matching panels or concealed handles help the appliances blend into the room and keep the focus on efficient design.
5) Opt for a fold-down breakfast bar instead of a full dining table.
A fold-down breakfast bar gives you dining space when you need it and disappears when you don’t, freeing floor area for movement. It fits small kitchens, studio apartments, and narrow galley layouts without requiring a dedicated dining zone.
Choose a wall-mounted or hinge-attached counter that matches your countertop height for comfortable seating. Use durable materials like plywood with a laminate finish or a solid wood top for a long-lasting surface.
Add slim, backless stools that tuck neatly under the bar to keep sightlines open and maintain visual space. Consider countertop extensions with brackets or a pull-out shelf if you want a temporary work surface for prep or a laptop.
Install under-bar hooks or a small shelf above the bar for frequently used items to keep the surface clear. Good task lighting—an adjustable sconce or a pendant—makes the bar more usable for meals and work.
Maximizing Kitchen Workflow
You’ll arrange work zones so walking distance and reaching are minimized. Prioritize direct paths between prep, cooking, and cleanup, and place appliances and storage where you’ll use them most.
Understanding the Work Triangle
Keep three primary points—sink, cooktop, and refrigerator—close but not cramped. Aim for 12–26 feet total perimeter distance between the three; shorter distances reduce steps, while longer ones waste time. In very small kitchens, a compact triangle of 7–12 feet can work if you avoid obstacles between points.
Position the sink between the cooktop and refrigerator when possible; this supports a natural flow from food storage to prep to cooking. Ensure at least 36 inches of clear aisle space in front of each workpoint so doors and drawers don’t block movement. Use task-specific storage—store knives and prep tools near the sink, pots and pans adjacent to the cooktop, and plates near the dishwasher—to cut motions and increase efficiency.
Space-Saving Appliance Placement
Choose appliance sizes and locations that match your routine. Install a narrower refrigerator (18–24″) if you mainly store perishables cleverly, or a 24″ dishwasher drawer if you wash small loads often. Place the microwave above the counter or integrated into cabinetry at elbow height to save counter space and keep it accessible without bending.
Mount the range hood or microwave over the cooktop to consolidate ventilation and maintain clear counters. If you use multiple small appliances, create a dedicated “appliance garage” with a retractable door near a power outlet to hide devices and keep cords tidy. Finally, cluster plumbing- and vent-dependent appliances (dishwasher, sink, and range) on the same wall when possible to reduce installation complexity and reclaim usable space.
Design Principles for Small Kitchens
Prioritize visual openness, functional surfaces, and targeted light so your kitchen feels larger and works better. Choose finishes that reflect light, keep clutter minimal, and layer task and ambient lighting for cooking and prep.
Choosing Colors and Finishes
Use a limited palette of two to three colors to avoid visual clutter. Light, neutral wall colors—soft white, warm beige, pale gray—reflect natural light and make the room appear bigger. Reserve stronger colors for one small focal element, like an island, lower cabinets, or backsplash.
Select cabinet finishes that balance reflection and durability. Semi-gloss or satin finishes on upper cabinets help bounce light without showing every fingerprint. Matte on lower cabinets hides wear. Match countertop color closely to cabinet tones to create visual continuity and reduce apparent seams.
Pick backsplash materials that are easy to clean and visually continuous with counters when possible—large-format tile or a single slab of stone works well. For hardware, choose slim-profile pulls in a single metal finish to keep lines tidy. Keep visible surfaces minimally patterned to reduce visual noise.
Lighting Strategies
Layer three light types: ambient, task, and accent. Ambient light can come from a central ceiling fixture or recessed cans; aim for even illumination of 300–500 lux at counter height. Task lighting must be bright and shadow-free—install under-cabinet LED strips or puck lights directly above prep zones.
Use directional pendant lights over islands or narrow tables to concentrate light where you work. Choose fixtures with a diffusing element to avoid glare. Add accent lighting in open shelving or toe-kick LEDs to create depth and a sense of space at night.
Pay attention to color temperature: 3000–3500K gives a warm, natural look for most kitchens. Use dimmers on ambient and pendant circuits so you can adjust brightness for cooking versus entertaining. Keep wiring and fixtures compact to preserve storage and clear sightlines.
Listen to this article 10 10 0:00 / 0:00 Speed 0.75×1×1.25×1.5×2× Ready to transform your tiny kitchen into a cozy farmhouse haven? These seven ideas proof that big charm can come in small packages. Let’s dive in and make your space feel warm, friendly, and totally you. 1. Open Shelving That Feels Like a Farmhouse…
Listen to this article 10 10 0:00 / 0:00 Speed 0.75×1×1.25×1.5×2× A great backyard kitchen does more than hold a grill. It turns your outdoor space into the place where everyone wants to hang out, snack, and stay long after the sun goes down. Whether you love hosting weekend cookouts or simply enjoy eating outside,…
Listen to this article 10 10 0:00 / 0:00 Speed 0.75×1×1.25×1.5×2× Floating shelves are that one upgrade that somehow makes your kitchen look custom, curated, and slightly Pinterest-famous overnight. No bulky cabinets, no visual clutter—just clean lines and space to show off your best pieces. And the best part? You can go minimal, rustic, bold,…
Listen to this article 10 10 0:00 / 0:00 Speed 0.75×1×1.25×1.5×2× There’s something about a country kitchen that makes everything feel better. Coffee tastes richer, cookies somehow bake prettier, and even unloading the dishwasher feels slightly less tragic. If you love spaces packed with warmth, texture, and that perfectly lived-in charm, these country kitchen ideas…
Listen to this article 10 10 0:00 / 0:00 Speed 0.75×1×1.25×1.5×2× Your kitchen splashback is doing way more than just catching spills—it’s basically the outfit your kitchen wears every day. Get it right, and suddenly everything looks intentional, polished, and just a little bit smug. Get it wrong… well, we don’t talk about that. Ready…
Listen to this article 10 10 0:00 / 0:00 Speed 0.75×1×1.25×1.5×2× Your kitchen deserves personality, not just stainless-steel seriousness. Ready to swap bland for bold? These kitschy kitchen ideas add color, charm, and just the right amount of “Did you really do that?” energy. Let’s make the heart of your home the most fun room…