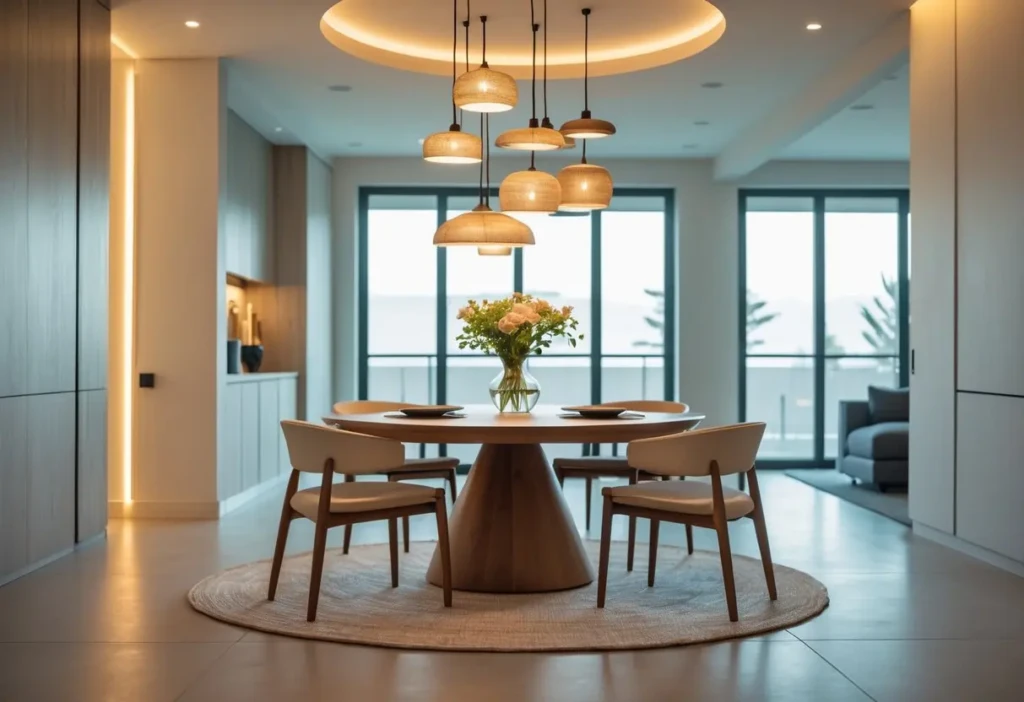
You want lighting that fits your round table and sets the mood for every meal. Choose a fixture that centers over the table, hangs at the right height, and matches your room’s scale to ensure even light and a balanced look. This post will show how to pick styles, materials, and finishes that work with your space and taste. You’ll find tips on size, placement, and layering light so your dining area feels inviting and functional. Expect clear guidance on installation and safety, plus style ideas that pair well with round tables and open floor plans. 45” Round Dining Table, Round Pedestal Dining Table | One-Piece … One-Piece 45″ Round Tabletop – Designed with a seamless one-piece tabletop instead of split panels, this round dining ta… Stable Pedestal Base – The thick engineered wood tabletop and supportive pedestal base help keep the kitchen table stead… Space-Saving Dining Table for 4 – The 45 inch circular design offers comfortable seating for up to 4 people while fittin… $479.99 Buy on Amazon Table of ContentsChoosing the Right Dining Room Light FixturesFixture Size and Table ProportionHeight and Placement GuidelinesLighting Types and Brightness LevelsBest Light Fixture Styles for Round TablesChandeliersPendant LightsFlush MountsMaterials and FinishesMetals and FinishesGlass and Crystal OptionsFabric and Natural MaterialsLighting Design Tips for AmbienceLayered Lighting TechniquesDimming OptionsColor Temperature SelectionInstallation and Safety ConsiderationsElectrical RequirementsFixture Mounting StepsSafety Precautions Choosing the Right Dining Room Light Fixtures Pick a fixture that matches your table size, hangs at the right height, and gives the right brightness for meals and conversation. Focus on proportion, placement, and light type to make the space both useful and attractive. Fixture Size and Table Proportion 42″ Round Dining Table for 4, Farmhouse Kitchen Table with Storag… Perfect Size for Everyday Gatherings (Seats 2–4 Comfortably): Designed for connection, this 42-inch round table comforta… Built-In Storage Shelf for a Clutter-Free Dining Space: Featuring a convenient lower storage shelf, this breakfast table… Heavy-Duty Stability for Daily Use: Crafted for durability, this dinner table for 2–4 features a reinforced X-shaped bas… $149.99 Buy on Amazon Measure your round table diameter first. A common rule: choose a fixture diameter that is about 1/2 to 2/3 of the table width. For example, a 48-inch table works well with a 24–32 inch fixture. If you use multiple pendants, add their widths together and keep the total within that same range. Leave at least 6–12 inches of table edge around the fixture so light spreads evenly without looking crowded. Consider ceiling height and room scale. Large fixtures suit high ceilings and open plans. Small rooms or low ceilings need slimmer, lower-profile options so the room feels balanced. Height and Placement Guidelines Hang the bottom of the fixture 28–34 inches above the tabletop for standard 8–9 foot ceilings. Raise the fixture by 3 inches for each extra foot of ceiling height. This keeps light close enough for detail but high enough for sight lines. Center the fixture over the table by measuring both table and room midpoints. If the table sits under a beam or near a wall, use a tape measure to confirm alignment rather than eyeballing it. For round tables, keep the fixture centered to maintain even light and visual balance. If you have multiple pendants, space them evenly and ensure bulbs don’t glare into diners’ eyes. 20”Hand Woven Rattan Chandelier Boho Pendant Light Adjustable Coa… Elegant Design: This exquisite woven rattan chandelier is crafted with intricate wicker weaving, delicately embedded wit… E12 Dimmable Socket: This woven rattan pendant lighting fixtures accommodates 6 x E12 bulbs (60w max, bulbs not included… Adjustable: The cord of this boho chandelier is adjustable from 1” to 38.33” (max) and will fit any height of the ceilin… $128.79 Buy on Amazon Lighting Types and Brightness Levels Use layered lighting: a primary fixture over the table, plus dimmable overhead or wall lights for ambiance. Choose LEDs for long life and consistent color temperature. Aim for 300–350 lumens per square meter (about 30–40 lumens per square foot) at the table surface for general dining tasks. For mood, add a dimmer so you can lower output to 100–150 lumens per square meter during dinner. Select color temperature around 2700–3000K for warm, natural skin tones. If you need task light for reading or projects, add a brighter local source but keep the dining fixture warm to preserve the room’s atmosphere. Best Light Fixture Styles for Round Tables Pick a fixture that matches your table’s diameter, ceiling height, and the room’s style. Aim for balanced scale, even light spread, and a shape that echoes the table to keep the look intentional. Chandeliers Chandeliers add a strong focal point above a round table. Choose one with a circular or tiered shape to mirror the table’s roundness and prevent visual tension. For a 48-inch table, a chandelier 20–28 inches wide usually fits well; raise or lower it to 30–36 inches above the tabletop for clear sight lines. Use dimmable bulbs or install a dimmer switch so you can shift from bright task lighting to soft mood light. If your ceiling is high, consider a multi-tier chandelier or a fixture with a longer stem to fill vertical space. Keep materials consistent with the room—metal for modern, crystal or glass for formal—to tie the look together. Pendant Lights Single pendant lights work well over small round tables; groupings of 3 or more pendants suit larger tables and add rhythm. For groupings, space pendants evenly and choose similar shapes and finishes to unify the arrangement. A common rule: total pendant width should be about half to two-thirds the table diameter. Select a pendant with a diffuser or a shade that directs light down to reduce glare and create a bright eating surface. Match the hanging height to the table—14–20 inches for low ceilings and 28–32 inches for higher room heights. Consider adjustable-height pendants so you can fine-tune placement after installation. Flush Mounts Flush mounts and semi-flush mounts work best when you have low ceilings or want unobtrusive light. Pick a round or softly curved fixture to echo the table and keep the room feeling cohesive. A semi-flush mount that hangs a few inches can create a softer shadow and a more layered look than a fully flush fixture. Choose a fixture with a diffuser to spread light evenly across the table and avoid hot spots. For dimmable options, use LED modules with a warm color temperature (2700K–3000K) to keep skin tones and food colors natural. If you need more task light, combine the flush mount with wall sconces or recessed lights on a separate circuit. Materials and Finishes Choose materials that match your table, room style, and how you use the space. Pay attention to durability, light quality, and how finishes show fingerprints or dust. Metals and Finishes Metal fixtures give a strong visual anchor over a round table. Brass and brass-plated finishes warm the room and pair well with wood tabletops. Matte black or oil-rubbed bronze creates contrast and hides smudges, which helps if you have kids or busy meals. Polished chrome and nickel reflect light and fit modern glass or marble tables, but they show fingerprints more. Think about maintenance and weight. Solid metal pieces last longer than plated ones but cost more. If your ceiling requires a lightweight option, choose thin-gauge metal or a metal frame with open design to reduce load. Match the metal finish to table hardware or chair legs for a cohesive look. Glass and Crystal Options Glass shades and crystal elements control glare and spread light evenly across a round table. Frosted glass softens light, so it works well for intimate dinners. Clear glass keeps a bright, crisp feel and shows the bulb, which suits decorative or filament bulbs. Crystal drops add sparkle and work best in rooms with higher ceilings and formal styles. Glass needs careful cleaning to avoid streaks. Choose seeded or tinted glass to hide dust and soften harsh bulbs. For everyday dining, pick thicker blown glass or molded glass that resists chips. If you want sparkle without heavy maintenance, consider smaller crystal accents rather than full crystal bodies. Fabric and Natural Materials Fabric shades and natural materials bring texture and warmth to your dining area. Linen or cotton drum shades diffuse light and create a soft, cozy glow that flatters skin tones. Rattan, wicker, and bamboo add a casual, organic feel and suit rustic or coastal tables. Consider fire safety and cleaning. Fabric shades should be treated or removable for washing. Natural fibers are lighter but can sag over time, so look for reinforced frames. Match the fabric color to your table runner or seat upholstery to tie the room together. Lighting Design Tips for Ambience Good ambient lighting for a round table balances bright task light over the surface with softer fills around the room. Control intensity, color, and layer placement so the table stays the focal point while the room feels warm and comfortable. Layered Lighting Techniques Use three light layers: task, ambient, and accent. Place a pendant or chandelier centered 30–36 inches above a standard-height round table to light plates and faces evenly. Choose a fixture with a wide shade or multiple bulbs to avoid harsh spots. Add ambient light with wall sconces or recessed cans at about 6–8 feet high to soften shadows. These should be on a separate circuit so you can run them independently from the table fixture. Use accent lights to highlight art, a buffet, or architectural features. Small directional LED spots or picture lights work well. Aim for a 3:1 ratio where task light is brighter than accent, and ambient sits between them. Dimming Options Install a compatible dimmer for each light layer so you can set levels for different activities. For LED fixtures, match the dimmer to the fixture’s driver to avoid flicker or limited range. Use multiple dimming zones: one for the table pendant, one for ambient wall lights, and one for accent lighting. This lets you run the pendant low for dinner while keeping ambient light higher for cleanup or games. Choose a dimmer type (triac/leading-edge or ELV/MLV) that fits your bulbs and wiring. For smart control, use a hub or a fixture with built-in wireless dimming to create preset scenes like “brunch,” “dinner,” and “party.” Color Temperature Selection Pick a color temperature that flatters skin tones and food. Warm white (2700–3000K) gives a cozy, inviting look and works best for most dining rooms with wood or warm décor. If you want a slightly brighter, modern feel, choose 3000–3500K. Avoid temperatures above 4000K; they can look harsh and clinical at the table. For flexibility, use tunable white fixtures or smart bulbs that let you shift between 2700K and 3500K. Set warmer light (2700K) for evening meals and slightly cooler light (3000K) for daytime tasks or cleaning. Installation and Safety Considerations You will need to confirm wiring, choose the right mounting method, and follow safety steps to protect yourself and your home. Pay attention to electrical load, secure mounting over the table center, and use proper personal protective gear. Electrical Requirements Check the circuit amperage that serves the dining room. Most fixtures draw under 3 amps, but if you plan multiple lights or dimmers, verify the breaker is 15–20 amps and that the total load stays below 80% of capacity. Turn off power at the breaker before touching any wiring. Match the fixture’s voltage to your home (usually 120V in the U.S.). Confirm wire types: hot (black or red), neutral (white), and ground (bare or green). Use wire connectors rated for the conductor size and the number of conductors joined. If adding a dimmer, pick one compatible with the bulb type (LED, halogen). Replace the junction box if it’s cracked or not rated for the fixture weight. If the box lacks capacity for the wires or hardware, install a new one sized per local code. Fixture Mounting Steps Locate and mark the table center on the ceiling using a plumb line or laser level. Measure the drop height: typical clearance is 28–34 inches from table to lowest fixture point for standard ceilings; adjust for taller ceilings or visual scale. Shut power off, remove the old fixture, and inspect the ceiling box. Attach the mounting bracket to the box with hardware rated for the fixture weight. If the fixture is heavy, use a ceiling brace or toggle anchors that can support the weight specified by the manufacturer. Make electrical connections: strip 3/4 inch of insulation, connect hot to hot, neutral to neutral, and ground to ground, then secure with proper-sized wire nuts. Tuck wires neatly into the box, hang the fixture on the bracket, and tighten all screws. Install bulbs and test power after restoring the breaker. Safety Precautions Always work with power off and verify with a non-contact voltage tester before touching wires. Wear safety glasses and use a stable ladder placed on a level surface. Have a helper hold the fixture during final mounting to prevent strain or dropping. Use fixtures and hardware rated for the location—damp-rated for humid dining areas near kitchens. Do not overload the junction box or use damaged wiring. If you find aluminum wiring, brittle insulation, or complex multi-circuit setups, stop and hire a licensed electrician. Follow local electrical codes and pull permits if required. Keep a fire extinguisher nearby during testing and never use higher-wattage bulbs than the fixture’s label allows.
You want lighting that fits your round table and sets the mood for every meal. Choose a fixture that centers over the table, hangs at the right height, and matches your room’s scale to ensure even light and a balanced look. This post will show how to pick styles, materials, and finishes that work with your space and taste.
You’ll find tips on size, placement, and layering light so your dining area feels inviting and functional. Expect clear guidance on installation and safety, plus style ideas that pair well with round tables and open floor plans.
Pick a fixture that matches your table size, hangs at the right height, and gives the right brightness for meals and conversation. Focus on proportion, placement, and light type to make the space both useful and attractive.
Measure your round table diameter first. A common rule: choose a fixture diameter that is about 1/2 to 2/3 of the table width. For example, a 48-inch table works well with a 24–32 inch fixture.
If you use multiple pendants, add their widths together and keep the total within that same range. Leave at least 6–12 inches of table edge around the fixture so light spreads evenly without looking crowded.
Consider ceiling height and room scale. Large fixtures suit high ceilings and open plans. Small rooms or low ceilings need slimmer, lower-profile options so the room feels balanced.
Height and Placement Guidelines
Hang the bottom of the fixture 28–34 inches above the tabletop for standard 8–9 foot ceilings. Raise the fixture by 3 inches for each extra foot of ceiling height. This keeps light close enough for detail but high enough for sight lines.
Center the fixture over the table by measuring both table and room midpoints. If the table sits under a beam or near a wall, use a tape measure to confirm alignment rather than eyeballing it.
For round tables, keep the fixture centered to maintain even light and visual balance. If you have multiple pendants, space them evenly and ensure bulbs don’t glare into diners’ eyes.
Use layered lighting: a primary fixture over the table, plus dimmable overhead or wall lights for ambiance. Choose LEDs for long life and consistent color temperature.
Aim for 300–350 lumens per square meter (about 30–40 lumens per square foot) at the table surface for general dining tasks. For mood, add a dimmer so you can lower output to 100–150 lumens per square meter during dinner.
Select color temperature around 2700–3000K for warm, natural skin tones. If you need task light for reading or projects, add a brighter local source but keep the dining fixture warm to preserve the room’s atmosphere.
Pick a fixture that matches your table’s diameter, ceiling height, and the room’s style. Aim for balanced scale, even light spread, and a shape that echoes the table to keep the look intentional.
Chandeliers
Chandeliers add a strong focal point above a round table. Choose one with a circular or tiered shape to mirror the table’s roundness and prevent visual tension. For a 48-inch table, a chandelier 20–28 inches wide usually fits well; raise or lower it to 30–36 inches above the tabletop for clear sight lines.
Use dimmable bulbs or install a dimmer switch so you can shift from bright task lighting to soft mood light. If your ceiling is high, consider a multi-tier chandelier or a fixture with a longer stem to fill vertical space. Keep materials consistent with the room—metal for modern, crystal or glass for formal—to tie the look together.
Pendant Lights
Single pendant lights work well over small round tables; groupings of 3 or more pendants suit larger tables and add rhythm. For groupings, space pendants evenly and choose similar shapes and finishes to unify the arrangement. A common rule: total pendant width should be about half to two-thirds the table diameter.
Select a pendant with a diffuser or a shade that directs light down to reduce glare and create a bright eating surface. Match the hanging height to the table—14–20 inches for low ceilings and 28–32 inches for higher room heights. Consider adjustable-height pendants so you can fine-tune placement after installation.
Flush Mounts
Flush mounts and semi-flush mounts work best when you have low ceilings or want unobtrusive light. Pick a round or softly curved fixture to echo the table and keep the room feeling cohesive. A semi-flush mount that hangs a few inches can create a softer shadow and a more layered look than a fully flush fixture.
Choose a fixture with a diffuser to spread light evenly across the table and avoid hot spots. For dimmable options, use LED modules with a warm color temperature (2700K–3000K) to keep skin tones and food colors natural. If you need more task light, combine the flush mount with wall sconces or recessed lights on a separate circuit.
Choose materials that match your table, room style, and how you use the space. Pay attention to durability, light quality, and how finishes show fingerprints or dust.
Metals and Finishes
Metal fixtures give a strong visual anchor over a round table. Brass and brass-plated finishes warm the room and pair well with wood tabletops. Matte black or oil-rubbed bronze creates contrast and hides smudges, which helps if you have kids or busy meals. Polished chrome and nickel reflect light and fit modern glass or marble tables, but they show fingerprints more.
Think about maintenance and weight. Solid metal pieces last longer than plated ones but cost more. If your ceiling requires a lightweight option, choose thin-gauge metal or a metal frame with open design to reduce load. Match the metal finish to table hardware or chair legs for a cohesive look.
Glass and Crystal Options
Glass shades and crystal elements control glare and spread light evenly across a round table. Frosted glass softens light, so it works well for intimate dinners. Clear glass keeps a bright, crisp feel and shows the bulb, which suits decorative or filament bulbs. Crystal drops add sparkle and work best in rooms with higher ceilings and formal styles.
Glass needs careful cleaning to avoid streaks. Choose seeded or tinted glass to hide dust and soften harsh bulbs. For everyday dining, pick thicker blown glass or molded glass that resists chips. If you want sparkle without heavy maintenance, consider smaller crystal accents rather than full crystal bodies.
Fabric and Natural Materials
Fabric shades and natural materials bring texture and warmth to your dining area. Linen or cotton drum shades diffuse light and create a soft, cozy glow that flatters skin tones. Rattan, wicker, and bamboo add a casual, organic feel and suit rustic or coastal tables.
Consider fire safety and cleaning. Fabric shades should be treated or removable for washing. Natural fibers are lighter but can sag over time, so look for reinforced frames. Match the fabric color to your table runner or seat upholstery to tie the room together.
Good ambient lighting for a round table balances bright task light over the surface with softer fills around the room. Control intensity, color, and layer placement so the table stays the focal point while the room feels warm and comfortable.
Layered Lighting Techniques
Use three light layers: task, ambient, and accent. Place a pendant or chandelier centered 30–36 inches above a standard-height round table to light plates and faces evenly. Choose a fixture with a wide shade or multiple bulbs to avoid harsh spots.
Add ambient light with wall sconces or recessed cans at about 6–8 feet high to soften shadows. These should be on a separate circuit so you can run them independently from the table fixture.
Use accent lights to highlight art, a buffet, or architectural features. Small directional LED spots or picture lights work well. Aim for a 3:1 ratio where task light is brighter than accent, and ambient sits between them.
Dimming Options
Install a compatible dimmer for each light layer so you can set levels for different activities. For LED fixtures, match the dimmer to the fixture’s driver to avoid flicker or limited range.
Use multiple dimming zones: one for the table pendant, one for ambient wall lights, and one for accent lighting. This lets you run the pendant low for dinner while keeping ambient light higher for cleanup or games.
Choose a dimmer type (triac/leading-edge or ELV/MLV) that fits your bulbs and wiring. For smart control, use a hub or a fixture with built-in wireless dimming to create preset scenes like “brunch,” “dinner,” and “party.”
Color Temperature Selection
Pick a color temperature that flatters skin tones and food. Warm white (2700–3000K) gives a cozy, inviting look and works best for most dining rooms with wood or warm décor.
If you want a slightly brighter, modern feel, choose 3000–3500K. Avoid temperatures above 4000K; they can look harsh and clinical at the table.
For flexibility, use tunable white fixtures or smart bulbs that let you shift between 2700K and 3500K. Set warmer light (2700K) for evening meals and slightly cooler light (3000K) for daytime tasks or cleaning.
You will need to confirm wiring, choose the right mounting method, and follow safety steps to protect yourself and your home. Pay attention to electrical load, secure mounting over the table center, and use proper personal protective gear.
Electrical Requirements
Check the circuit amperage that serves the dining room. Most fixtures draw under 3 amps, but if you plan multiple lights or dimmers, verify the breaker is 15–20 amps and that the total load stays below 80% of capacity. Turn off power at the breaker before touching any wiring.
Match the fixture’s voltage to your home (usually 120V in the U.S.). Confirm wire types: hot (black or red), neutral (white), and ground (bare or green). Use wire connectors rated for the conductor size and the number of conductors joined.
If adding a dimmer, pick one compatible with the bulb type (LED, halogen). Replace the junction box if it’s cracked or not rated for the fixture weight. If the box lacks capacity for the wires or hardware, install a new one sized per local code.
Fixture Mounting Steps
Locate and mark the table center on the ceiling using a plumb line or laser level. Measure the drop height: typical clearance is 28–34 inches from table to lowest fixture point for standard ceilings; adjust for taller ceilings or visual scale.
Shut power off, remove the old fixture, and inspect the ceiling box. Attach the mounting bracket to the box with hardware rated for the fixture weight. If the fixture is heavy, use a ceiling brace or toggle anchors that can support the weight specified by the manufacturer.
Make electrical connections: strip 3/4 inch of insulation, connect hot to hot, neutral to neutral, and ground to ground, then secure with proper-sized wire nuts. Tuck wires neatly into the box, hang the fixture on the bracket, and tighten all screws. Install bulbs and test power after restoring the breaker.
Safety Precautions
Always work with power off and verify with a non-contact voltage tester before touching wires. Wear safety glasses and use a stable ladder placed on a level surface. Have a helper hold the fixture during final mounting to prevent strain or dropping.
Use fixtures and hardware rated for the location—damp-rated for humid dining areas near kitchens. Do not overload the junction box or use damaged wiring. If you find aluminum wiring, brittle insulation, or complex multi-circuit setups, stop and hire a licensed electrician.
Follow local electrical codes and pull permits if required. Keep a fire extinguisher nearby during testing and never use higher-wattage bulbs than the fixture’s label allows.
Listen to this article 10 10 0:00 / 0:00 Speed 0.75×1×1.25×1.5×2× Choosing the right dining room light fixture is essential for creating both the desired ambiance and a focal point in the space. The fixture sets the tone for the room, balancing style and functionality to enhance any meal or gathering. Seven dining room light fixture ideas…
Listen to this article 10 10 0:00 / 0:00 Speed 0.75×1×1.25×1.5×2× Think your small dining room is doomed to feel cramped forever? Not a chance. With the right design tricks, even the tiniest space can feel open, airy, and surprisingly stylish. These ideas don’t just save space—they completely transform how your dining room looks and…
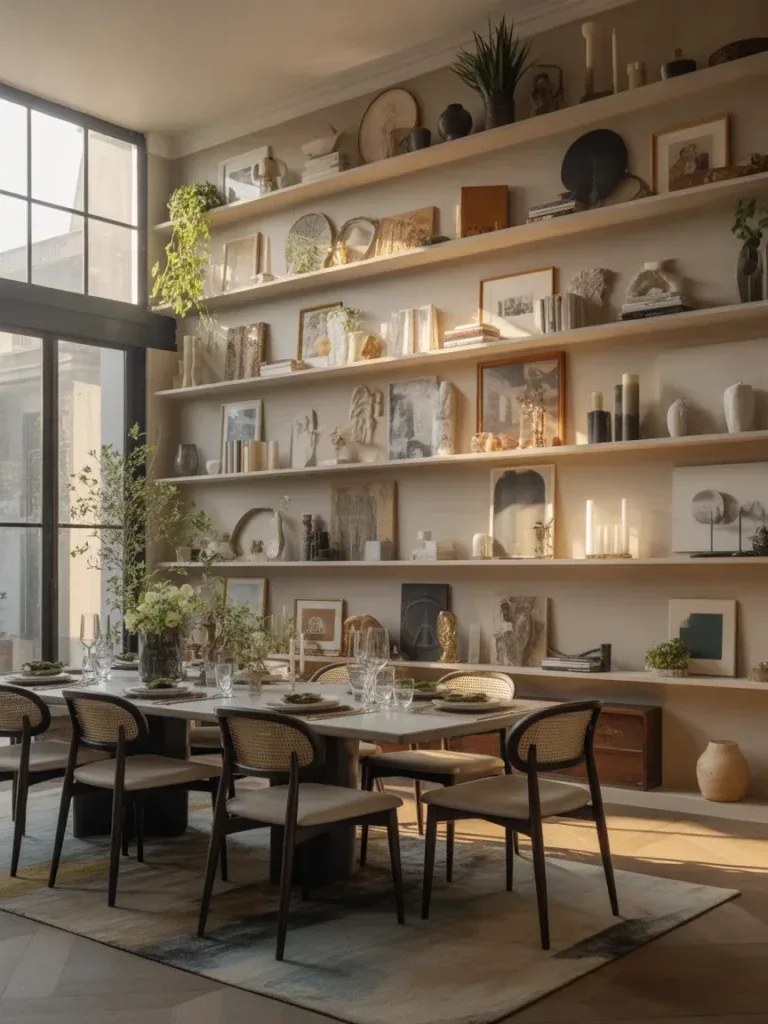
Listen to this article 10 10 0:00 / 0:00 Speed 0.75×1×1.25×1.5×2× Floating shelves in a dining room can go one of two ways: effortlessly curated and designer-level chic… or “why is there random stuff stacked on the wall?” real fast. The trick is styling them with intention so they look polished instead of chaotic. If…
Listen to this article 10 10 0:00 / 0:00 Speed 0.75×1×1.25×1.5×2× Blank dining room walls can make even the prettiest table setup feel unfinished. Floating shelves fix that fast—and they do way more than hold a random vase and a candle you forgot to light. The right shelf styling can make your dining room feel…
Listen to this article 10 10 0:00 / 0:00 Speed 0.75×1×1.25×1.5×2× Tiny dining room? No problem. A round dining table can completely change how your space feels, and honestly, it’s one of those design tricks that works way harder than people give it credit for. No sharp corners, easier flow, and somehow everyone ends up…
Listen to this article 10 10 0:00 / 0:00 Speed 0.75×1×1.25×1.5×2× You face a small dining room and a low ceiling, but you can still make the space feel bright and balanced. Choose fixtures that sit close to the ceiling or use shallow pendants to keep headroom and spread light evenly across the table. Pick low-profile or…